
Two Shot Molding: How to Get the Best Soft-Touch Parts
Two shot molding is an injection molding process that molds two materials into one part in a single machine cycle. First, the machine injects a rigid substrate; then the mold rotates or shifts, and a second injection unit adds a second material, such as a soft TPE grip, directly onto it. As a result, the two materials bond without a separate assembly step.
The process looks simple from the outside. However, most two shot molding problems come from inside the tool: a rotary platen that indexes a fraction off position, a second shot that floods the first, or a core that is not confirmed before the mold closes. For example, a 0.05 mm shift between stations can leave a visible step on every grip edge. In this guide, we focus on the process itself and on the checks that keep a two-shot injection mold running.
Two shot molding, also called 2K or two-component molding, injects two different materials or colors into the same mold in one cycle. A rotary platen, index plate, core-back or robot transfer moves the first-shot part into a second cavity, where the second material bonds to it. It suits high-volume parts with soft grips, seals, multi-color buttons and integrated gaskets, but it needs compatible materials, an accurate transfer datum and a strict interlock sequence.
In short: two shot molding replaces assembly with tooling precision, so the mold and the sequence decide the quality.
Key points:
- Material pairing decides whether the second shot bonds chemically or needs mechanical interlocks.
- Transfer accuracy between stations decides edge quality and flash.
- Interlocks decide whether the mold runs safely at full speed.
What Is Two Shot Molding?
Two shot molding is a single-cycle process that combines two materials in one part using a machine with two injection units. The first shot forms a substrate; the second shot forms the overmold on top of it, while the substrate is still warm.
Because both shots happen in one machine, the bond forms under controlled heat and pressure. Therefore, two shot molding usually gives a stronger and more consistent bond than overmolding a cold part in a second machine.
Typical two shot molding parts include:
- Power tool and kitchen tool handles with soft-touch grips
- Automotive switches and buttons with two colors
- Housings with molded-in seals or gaskets
- Medical device grips and drug-delivery components
- Consumer electronics bezels and keypads
The existing comparison on our blog, two-shot molding vs overmolding, covers when each method wins. This article covers how two shot molding itself works and how to control it.
Key Takeaway: Treat two shot molding as one process with two shots, not two processes. Its quality depends on the transfer between shots.
How Does the Two Shot Molding Process Work?
The two shot molding process works by injecting the first material, moving the part to a second cavity and injecting the second material, all inside one closed cycle. The movement method depends on the mold design.
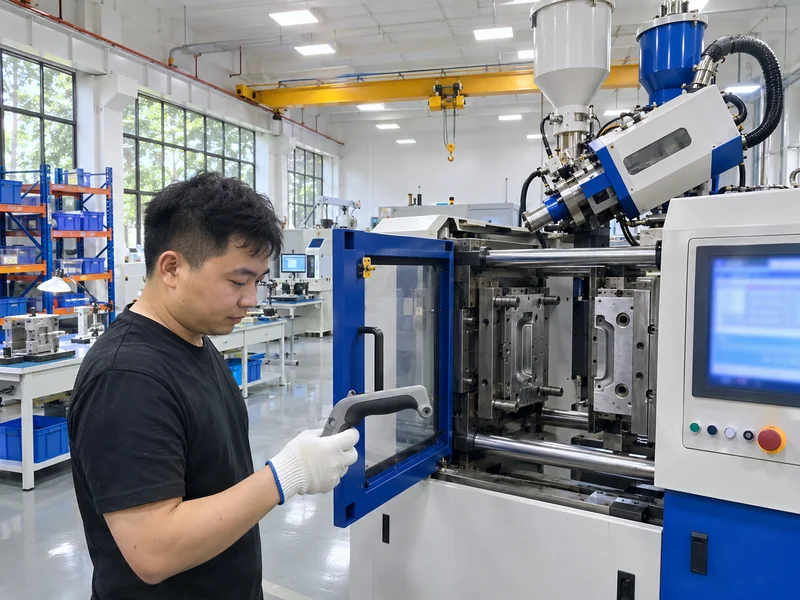
Rotary platen or rotary table
- The moving half rotates 180° between shots, so each core sees both cavities in turn.
- It is the most common method for high volumes.
- Both cavities run at the same time, so each cycle yields a finished part.
Index plate or rotating core
- Only a core or a plate inside the mold rotates.
- It suits smaller parts and machines without a rotary platen.
Core-back (core-pull)
- A core retracts after the first shot to open space for the second material.
- No rotation is needed, but the second material can only fill the space the core leaves.
Robot transfer
- A robot moves the first-shot part into a second cavity.
- It offers flexibility, but adds handling time and cooling of the substrate.
For example, a two-color handle with a grip on two sides usually needs a rotary platen. A simple gasket on a flat cover, by contrast, can often use a core-back design.
Key Takeaway: Choose the transfer method by part geometry and volume. Rotary platens suit most high-volume two shot molding; core-back suits simple second shots.
Which Material Pairs Bond in Two Shot Molding?
Material pairs bond in two shot molding when they are chemically compatible and processed within the right temperature window. If they are not compatible, the design must add mechanical interlocks.
| First shot (substrate) | Second shot | Typical bond |
|---|---|---|
| PP | TPE-S (SEBS-based) | Good chemical bond with matched grades |
| ABS | TPE (ABS-bonding grade) or TPU | Good with bonding grades |
| PC or PC/ABS | TPU or PC-bonding TPE | Good with bonding grades |
| PA6 / PA66 | PA-bonding TPE | Fair to good; dry the nylon well |
| PBT | TPE (PBT-bonding grade) | Good with bonding grades |
| POM | Most TPEs | Poor; use mechanical interlocks |
TPE suppliers publish bonding grades for specific substrates. Therefore, the resin choice should name both materials together, not separately.
In practice, the second shot also shrinks onto the substrate. That shrinkage can warp thin substrates. As a result, a thicker or ribbed substrate is often needed where the soft material covers a large area.
Key Takeaway: Specify the material pair, not just two materials. When the pair does not bond, add undercuts, through-holes or ribs for a mechanical lock.
How Is the Rotary Platen Aligned in a Two Shot Mold?
The rotary platen is aligned in a two shot mold by locating the rotating half on precise guide elements and checking that each core lands in the same position in both cavity stations. Small errors show up as steps, flash or thin walls on the second shot.
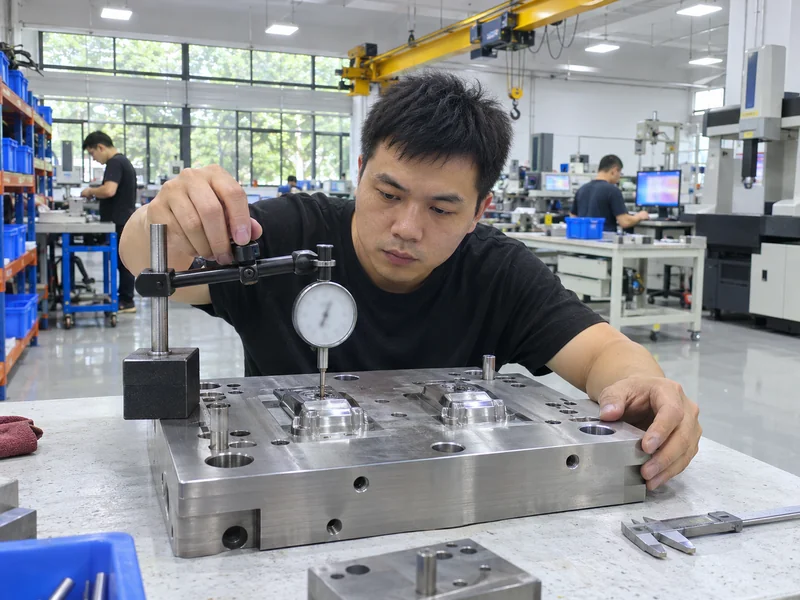
A practical alignment check includes:
- Core-to-cavity fit at both stations, checked with the mold closed and blued or measured.
- Rotation repeatability, checked with a dial indicator on a reference face after several rotations.
- Parallelism of the rotating plate to the fixed half, so both stations close evenly.
- Heat check, repeating the measurement at production mold temperature.
For example, if one core sits slightly off center, the second shot is thicker on one side and thinner on the other. Over a full production lot, that shows up as uneven grip feel and occasional flash. Therefore, alignment checks belong in every mold trial report, not only in the first one.
Key Takeaway: Check rotary alignment hot, not just cold. Most two shot molding edge defects trace back to small station-to-station offsets.
What Interlock Sequence Does a Two Shot Mold Need?
A two shot mold needs an interlock sequence that confirms every movement before the next step starts. The mold, the rotary unit and both injection units must agree on the state of the tool.
A typical sequence:
- First and second shots inject into their stations.
- Cooling completes, then the mold opens.
- The finished part is ejected from the second station only.
- The rotary unit turns, and its end position is confirmed.
- Core and slide positions are confirmed.
- The mold closes and the cycle repeats.
Each step needs a signal. For example, the rotary position needs a sensor at both end positions, and ejection must be limited to the station that holds the finished part. Many molders use EUROMAP interface standards for the signal exchange between the mold, the machine and the robot.
Here’s the thing: a missed interlock does not always cause a crash. Sometimes it causes a “short” second shot because the substrate was not fully seated. As a result, defects appear randomly and are hard to trace.
Key Takeaway: Write the interlock sequence into the mold specification. Ask which signal proves each step, especially rotation end positions.
How Is the Transfer Datum Set Between Shots?
The transfer datum is set between shots by locating the first-shot part on the same features in both stations. Those features then define where the second material lands.
Good datum practice includes:
- Locate the substrate on rigid, functional features, such as holes or bosses, not on cosmetic surfaces.
- Keep the substrate on the same core for both shots whenever possible.
- Design shut-off surfaces where the second material stops, with enough contact to prevent flash.
- Allow for substrate shrinkage between the first and second station.
For instance, a soft grip that should stop exactly at a groove needs a clean steel shut-off at that groove. If the substrate moves even slightly, the TPE floods past the groove. In addition, the substrate must stay supported against injection pressure in the second station.
Key Takeaway: Define the datum and shut-offs on the part drawing. The second shot can only be as accurate as the substrate’s location.
What Design Rules Apply to Two Shot Molding Parts?
Design rules for two shot molding parts focus on wall thickness, shut-offs, bonding area and gate locations for both materials.
- Substrate thickness: keep it thick enough to resist the second-shot pressure and shrinkage.
- Soft material thickness: usually thin and even, so it fills and cools consistently.
- Shut-off design: use grooves or steps where the second material ends, rather than feathered edges.
- Bonding area: increase it with texture, ribs or holes where the bond is critical.
- Gating: gate the second shot so it flows across the substrate, not into a thin edge.
- Venting: vent the second shot well, because trapped air shows as voids under soft materials.
Key Takeaway: Design the substrate and the overmold together. Most two shot molding defects start with a substrate that was designed alone.
What Does Two Shot Molding Cost Compared With Overmolding?
Two shot molding usually costs more in tooling but less per part at volume than overmolding in two separate molds. The break-even depends on volume, cycle time and labor.
| Cost factor | Two shot molding | Overmolding (two molds) |
|---|---|---|
| Tooling | One complex mold with rotation | Two simpler molds |
| Machine | Two-component machine | Standard machines |
| Labor | Low; parts finish in one cycle | Higher; parts are loaded by hand or robot |
| Bond quality | Usually higher and more consistent | Depends on substrate temperature and handling |
| Best volume range | Medium to high | Low to medium |
For example, a few thousand parts a year usually favor overmolding, which our guide to insert molding vs overmolding also covers. Hundreds of thousands, by contrast, usually favor two shot molding.
Key Takeaway: Compare total part cost over the program life, not tooling cost alone. Volume decides which method wins.
What Should Buyers Send for a Two Shot Molding Quote?
Buyers should send a 3D model and 2D drawing for both materials, the material pair, color requirements and annual volume. With this, the mold maker can choose the transfer method and machine size.
A complete RFQ package includes:
- 3D model with separate bodies for the substrate and the second shot
- 2D drawing with shut-off lines, critical dimensions and appearance areas
- Material pair with grades, hardness (for example Shore A for the TPE) and colors
- Annual volume and target cavities
- Bond requirement, such as a peel test or functional test
Our Shenzhen plant runs 5 two-shot presses for series production, and our Dongguan factory runs a Haitian 250 T two-shot trial machine. You can read more about our two-shot injection molding service.
Key Takeaway: Send both materials and the volume with the drawing. Those inputs decide whether two shot molding or overmolding is the right route.
FAQ
- Q: What is the difference between two shot molding and overmolding?
- Two shot molding molds both materials in one machine cycle. Overmolding usually molds the substrate first, then places it into a second mold for the second material.
- Q: Which materials work best in two shot molding?
- Common pairs are PP with TPE-S, PC or ABS with TPU or bonding TPEs, and PBT or PA with matching bonding TPE grades.
- Q: Is two shot molding more expensive?
- The mold costs more, but parts finish in one cycle with less labor. At medium and high volumes, the part cost is often lower than overmolding.
- Q: What is a rotary platen in two shot molding?
- It is a rotating mold half that moves the first-shot part from the first cavity to the second cavity between shots.
- Q: Can two shot molding make parts with three materials?
- Yes, with three injection units and a suitable mold, but the tooling and sequence become much more complex.
Conclusion
Two shot molding delivers integrated grips, seals and multi-color parts in one cycle when the material pair, transfer datum and interlocks are right. Plan the substrate and second shot together, and check alignment at production temperature. To review your two-material part, send your 3D model and 2D drawing to our engineering team.