
Stack Mold: How to Get the Best Output Without Waste
A stack mold is an injection mold with two or more parting lines stacked back to back, so it can double the number of cavities without needing a larger clamping force. Because the projected areas of the levels sit behind each other, the clamp force stays close to that of a single-level mold while the output nearly doubles. As a result, stack molds are popular for high-volume, flat or shallow parts such as lids, caps and thin-wall containers.
The trade-off is complexity. A stack mold needs a moving center section, a hot runner that feeds both levels, a synchronized opening mechanism and much more press opening space. For example, a stack mold that fits the press tie bars can still fail to run if the machine’s daylight is too short to eject parts from both levels. In this guide, we explain how a stack mold works, when it pays off and which checks protect the project. Our multi-cavity injection molds page covers single-level high-cavitation tools.
A stack mold places two (or more) mold levels behind each other, with a floating center section between the fixed and moving platens. A hot runner manifold in the center section feeds both levels, and a rack-and-pinion, toggle or hydraulic linkage opens both parting lines together. Because the levels share one projected area for clamp force, a stack mold can nearly double output on the same machine, but it requires extra daylight, precise synchronization and careful maintenance planning.
In short: a stack mold buys output with press opening space and tool complexity.
Key points:
- Output: close to twice the cavities on the same clamp tonnage.
- Press fit: shut height plus two opening strokes must fit the machine’s daylight.
- Complexity: hot runner, synchronization and maintenance access decide uptime.
What Is a Stack Mold?
A stack mold is a multi-level injection mold where two or more sets of cavities are arranged one behind the other rather than side by side. The mold has a fixed half, a moving half and a floating center section that carries cavities or cores on both faces.
The main advantage comes from clamp force. Clamp force depends on the projected area of the parts in the direction of clamping. In this layout, the cavities of the second level sit behind the first, so the projected area barely increases. Therefore, a press sized for 16 cavities in one level can often run 32 cavities in a two-level stack mold.
Common stack mold types:
- Two-level stack molds, the most common
- Three- and four-level stack molds, for very high volumes of thin parts
- Tandem molds, where levels open alternately rather than together
Key Takeaway: A stack mold multiplies cavities without multiplying clamp tonnage. That is its whole business case.
How Does a Stack Mold Work?
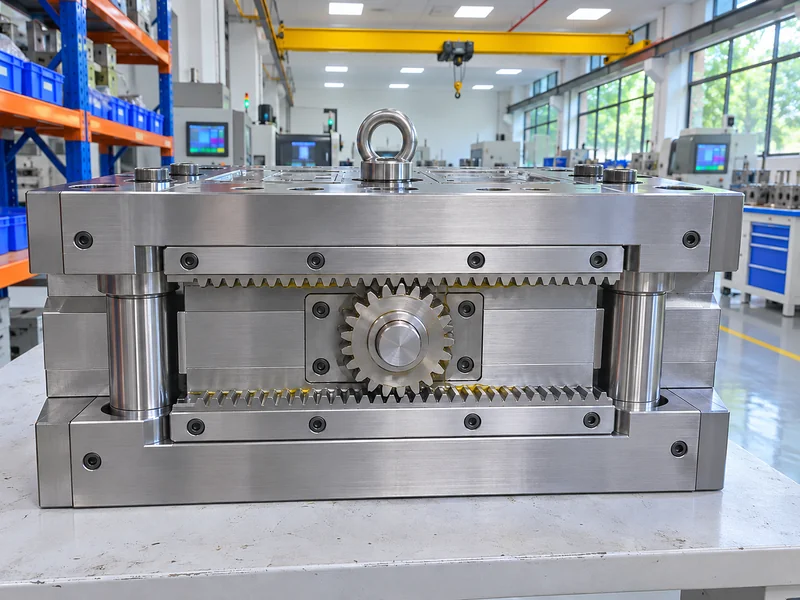
A stack mold works by feeding melt through the center section to both levels and opening both parting lines at the same time with a synchronized linkage.
Melt delivery
- A sprue bar or melt transfer nozzle passes through the moving platen side to the center section.
- A hot runner manifold in the center section distributes melt to both levels.
- Each cavity has its own hot runner nozzle, so both levels fill together.
Opening and closing
- A rack-and-pinion linkage keeps both parting lines opening equally.
- Toggle linkages or hydraulic cylinders are also used.
- The center section is supported on the machine tie bars or on its own guide system.
Ejection
- Each level has its own ejection system.
- Both levels must eject before the mold closes again.
For example, a 2 × 16 cavity lid stack mold runs one hot runner, two ejection systems and one linkage. If the linkage wears, one level opens more than the other, and parts can drop into the wrong side.
Key Takeaway: Synchronization keeps the mold running. Ask how the opening is linked, how wear is monitored and how each level is ejected.
Which Parts Suit a Stack Mold?
Parts suit this design when they are flat or shallow, small in projected area, produced in very high volume and easy to eject from both levels.
- Lids, caps and closures
- Thin-wall containers and cups
- Flat medical and packaging components
- Small technical parts with short cooling times
Parts that usually do not suit this design:
- Deep parts that need long opening strokes
- Parts with large slides or complex side actions
- Low-volume programs where tooling cost cannot pay back
- Parts with long cooling times, where cycle time dominates
Key Takeaway: Flat, fast-cycling, high-volume parts suit stack molds best. Deep or complex parts usually belong in a single-level mold.
Stack Mold vs Multi-Cavity Mold: Which Is Better?
A stack mold vs a multi-cavity single-level mold comes down to press size, output and complexity. A stack mold gets more output from the same clamp tonnage; a larger single-level mold gets similar output with simpler tooling on a bigger press.
| Factor | Stack mold | Single-level multi-cavity mold |
|---|---|---|
| Clamp force for the same output | Lower | Higher |
| Press size | Smaller tonnage, more daylight | Larger tonnage and platen |
| Tool complexity | Higher: center section, linkage, two ejection systems | Lower |
| Maintenance | More complex | Simpler |
| Best fit | Very high volume, flat parts, limited press size | High volume where a larger press is available |
For example, if a plant already has a 300 T press with long daylight, the mold can double output without buying a 500 T press. However, if a larger press is available, a single-level mold may be simpler to run and maintain. Our comparison of multi-cavity vs family injection molds explains the cavity trade-offs further.
Key Takeaway: Choose this design when press tonnage is the constraint and daylight is available. Otherwise, a single-level mold is usually easier.
How Do You Check Press Daylight for a Stack Mold?
You check press daylight for the mold by adding the mold’s shut height to the opening stroke needed by both levels, then comparing the total with the machine’s maximum daylight. This check must happen before the mold design is fixed.
A practical calculation:
- Mold shut height: the closed height of the full stack mold
- Opening per level: part height plus ejection and drop clearance
- Total opening: opening per level × number of levels
- Required daylight: shut height + total opening
For example, a mold with a 700 mm shut height and parts that need 150 mm opening per level needs about 700 + 2 × 150 = 1,000 mm daylight. If the press offers 950 mm, the parts will not clear the mold.
Platen mounting patterns and machine interfaces are often defined with EUROMAP standards, so state which standard the press follows.
Also check:
- Tie bar spacing and platen size for the mold footprint
- Machine opening stroke and speed
- Ejector connections for both levels
- Hot runner controller zones and cable routing
- Robot access, if parts are removed automatically
Key Takeaway: Confirm daylight, tie bars and stroke with the molder’s actual press data. A stack mold designed for a “typical” press often does not fit the real one.
What Hot Runner Design Does a Stack Mold Need?
A stack mold needs a hot runner that delivers balanced melt to both levels through the moving center section. The melt path is longer and more complex than in a single-level mold.
Key design points:
- A melt transfer nozzle or sprue bar that separates cleanly at each opening
- A balanced manifold, so both levels fill and pack equally
- Thermal separation between the hot manifold and the cooled cavity plates
- Heater and thermocouple wiring routed safely through the moving section
- Leak prevention at the transfer nozzle, where drool can cause stringing
Hot runner brands such as YUDO, Mold-Masters, HASCO or Synventive are selected per customer requirement. As a result, spare parts and service support should be agreed before the mold is built.
Key Takeaway: Treat the hot runner as the heart of the mold. Balance, transfer nozzle design and wiring decide uptime.
How Should Stack Mold Maintenance Access Be Planned?
Stack mold maintenance access should be planned during design, because the center section is heavy and full of hot runner components. If technicians cannot reach heaters, nozzles or wear parts without fully stripping the mold, downtime grows.
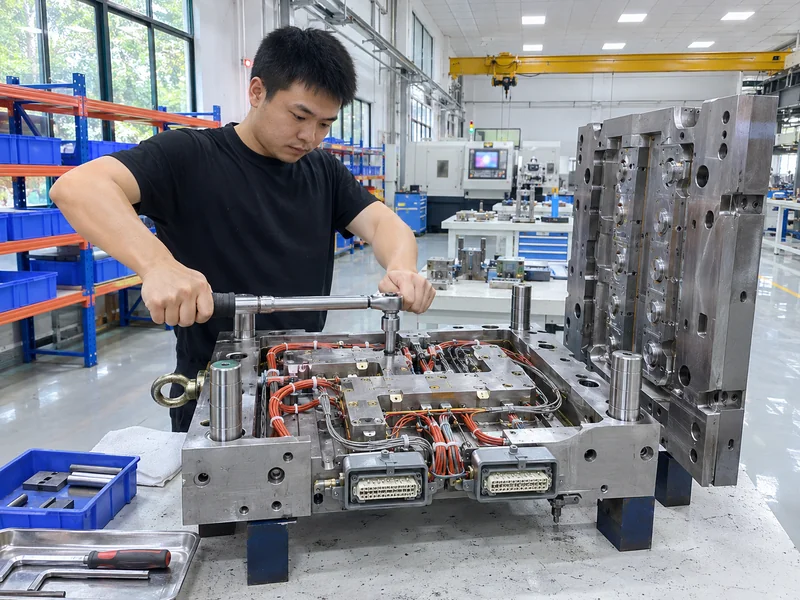
A good service plan includes:
- Lifting points on the center section, rated for its weight
- Split lines that let technicians open the manifold area without removing both levels
- Accessible wiring, with labeled connectors outside the mold
- Wear-part lists for linkage racks, pinions, guide bushings and nozzle tips
- Preventive maintenance intervals based on shots, not calendar time
For example, replacing a nozzle heater in a poorly planned stack mold can take a full shift. In a mold designed for service, it can take an hour. Our guide to mold maintenance covers general maintenance practice.
Key Takeaway: Ask for a maintenance access drawing and a spare parts list with the mold. They pay back on the first breakdown.
What Are the Risks of a Stack Mold?
The risks of this design come from its moving center section, its longer melt path and its tighter fit in the press.
- Unbalanced filling between levels causes dimensional differences.
- Linkage wear causes uneven opening and part drop problems.
- Transfer nozzle leaks cause drool and stringing.
- Center section sag on long cycles misaligns cavities.
- Longer setup times because of weight, wiring and two ejection systems.
Therefore, the mold should be validated with dimensional checks on both levels and every cavity, not only on a sample of the first level.
Key Takeaway: Validate both levels separately during trials. A stack mold that passes on one level can still fail on the other.
What Should Buyers Send for a Stack Mold Quote?
Buyers should send a 3D model and 2D drawing, annual volume, material and the target press details. Press data is essential for this kind of quote.
A complete package includes:
- 3D model and 2D drawing, with critical dimensions and cosmetic areas
- Material grade and color
- Annual volume and target cavities per level
- Press data: tonnage, tie bar spacing, maximum daylight, opening stroke, ejector layout
- Hot runner preference and any brand requirement
A typical mold lead time at WOKE Molds is 4–8 weeks depending on complexity, steel, hot runner and validation. For complex tools, it can be longer, so we confirm the schedule after design review. You can also review our custom injection mold manufacturing process.
Key Takeaway: Include the press data with the drawing. Without it, any quote for this tool is only a guess.
FAQ
- Q: What is a stack mold in injection molding?
- It is a mold with two or more parting lines stacked behind each other, which increases cavities without a proportional increase in clamp force.
- Q: How much more output does a stack mold give?
- A two-level stack mold can nearly double output on the same press, though the cycle may be slightly longer.
- Q: What is the main limitation of a stack mold?
- It needs extra press daylight and more complex tooling, hot runners and maintenance.
- Q: Which parts suit stack molds?
- Flat or shallow, high-volume parts such as lids, caps and thin-wall containers.
- Q: Do stack molds need hot runners?
- Almost always. A hot runner in the center section feeds both levels efficiently.
Conclusion
A stack mold doubles output on the same clamp tonnage when the part is flat, the volume is high and the press has enough daylight. Plan the hot runner, synchronization and maintenance access from the start. To check whether a stack mold fits your part and press, send your 3D model, 2D drawing and press data to our engineers.