
Decoupled Molding: V/P Switchover and Gate Freeze
Decoupled molding is a process method that separates filling, packing and holding into controlled stages, instead of letting one pressure setting do everything. Fill is controlled by speed, packing by pressure, and the switch between them by screw position. The result is a process that stays stable when resin viscosity, temperature or the machine changes slightly.
Without it, a process often “works” only on one machine on one day. For example, a part may pass in the morning and show short shots in the afternoon, because the resin lot changed and pressure-controlled filling reacted to it. In this guide, we explain decoupled molding step by step, including machine compatibility, clamping force, shot size, V/P switchover, gate freeze, cushion and back pressure. For the basic cycle, see our guide to the injection molding process.
Decoupled molding separates the injection cycle into a velocity-controlled fill stage, usually to about 95–98% full, a position-based transfer (V/P switchover), and a pressure-controlled pack and hold stage. The fill stage should not be pressure-limited. The hold time is set from a gate freeze study, the cushion must stay consistent, and back pressure and screw recovery are set for a uniform melt. Before the study, check that the press has enough clamping force, shot capacity and mold-fit dimensions.
In short: fill by speed, switch by position, pack by pressure, and prove each setting with a study.
Key points:
- Fill: velocity-controlled, not pressure-limited.
- Switchover: by screw position, with a stable cushion.
- Hold: time set by a gate freeze study.
What Is Decoupled Molding?
Decoupled molding is a scientific molding method that controls fill and pack as separate stages. It is often called “decoupled II” when fill and pack/hold are separated, and “decoupled III” when packing is controlled by cavity pressure.
The idea is simple:
- Stage 1 (fill): inject at a set speed until the part is mostly full.
- Stage 2 (pack): apply pressure to finish filling and compensate shrinkage.
- Stage 3 (hold): keep pressure until the gate freezes.
Because each stage has one job, each setting can be tested and documented. As a result, the process can be transferred between machines with fewer surprises.
Key Takeaway: Decoupled molding turns process settings into documented decisions, not guesses.
How Do You Check Machine Compatibility Before Decoupled Molding?
You check machine compatibility before decoupled molding by confirming that the mold fits the press and that the press can deliver the speed and pressure the process needs.
Inspection points for mold and machine compatibility:
- Tie-bar spacing and platen size: the mold must fit and be supported.
- Mold height range and opening stroke: the press must close and open fully.
- Locating ring and sprue bushing: sizes and radii must match the nozzle.
- Ejector pattern and stroke: knock-out positions must match the mold.
- Water, air and hot-runner connections: enough circuits and power.
For example, a mold that fits the platen but needs more opening stroke than the press offers cannot eject tall parts. Machine and mold interfaces follow standards such as those from EUROMAP.
Key Takeaway: Record the press data in the mold quote. Compatibility problems found at trial cost days.
How Do You Calculate Clamping Force for Decoupled Molding?
You calculate clamping force by multiplying the projected area of the parts and runners by a pressure factor for the resin and wall thickness.
Clamping force (t) ≈ projected area (cm²) × factor (t/cm²)
Typical factors are roughly 0.3–0.8 t/cm², higher for thin walls and stiff flow resins. A worked example:
- Projected area of 4 cavities and runner: 160 cm²
- Factor for PC with 2 mm walls: about 0.6 t/cm²
- Clamping force ≈ 160 × 0.6 = 96 t
Therefore, a press of about 120–150 t gives margin. Too little clamp causes flash. However, too much clamp can crush vents and stress the mold.
Key Takeaway: Size the clamp with margin, then set it as low as flash allows during the trial.
How Do Shot Size and Cushion Affect Decoupled Molding?
Shot size and cushion affect decoupled molding because the fill stage needs a stable melt volume and the pack stage needs a reserve of material.
Guidelines:
- Shot size: use about 20–80% of the barrel capacity. Very small shots give long residence time; very large shots give poor melt quality.
- Cushion: the material left in front of the screw at the end of hold, typically a few millimeters. It must never reach zero.
- Consistency: a cushion that varies shot to shot shows a check-ring or process problem.
For example, a cushion that drops to zero means the screw has bottomed out, so packing pressure no longer reaches the part. As a result, sink marks and short shots appear. Our guide to sink marks explains the link.
Key Takeaway: Monitor cushion on every shot. It is the simplest early warning in decoupled molding.
How Do You Set V/P Switchover in Decoupled Molding?
You set V/P switchover in decoupled molding by transferring from velocity control to pressure control at a screw position where the part is about 95–98% full.
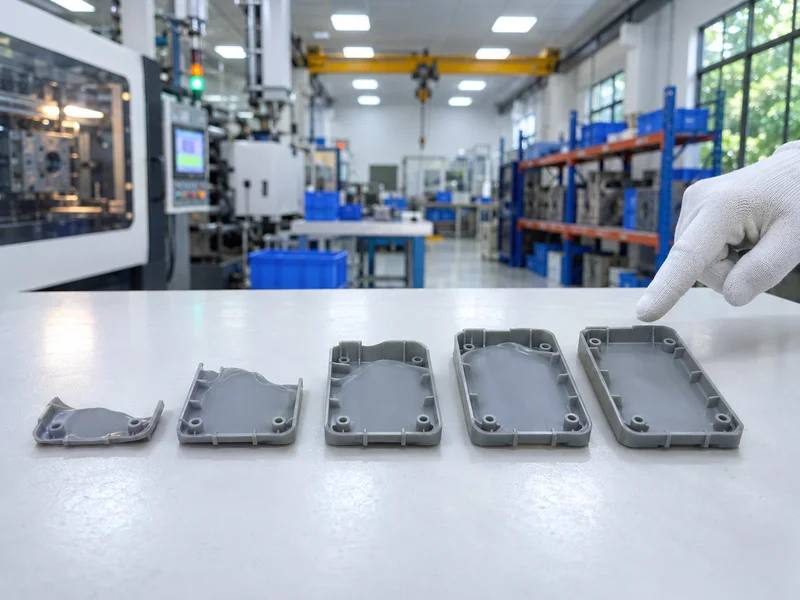
The steps:
- Run fill-only shots with zero pack and hold pressure.
- Adjust the transfer position until the part is about 95–98% full, with no flash.
- Check the fill pressure. The peak pressure must stay below the machine limit, so fill is not pressure-limited.
- Add pack and hold to complete the part.
Switching by position is more repeatable than switching by time, because it does not depend on fill speed. In addition, some processes switch by cavity pressure for even more control.
Key Takeaway: A fill-only short shot is the most useful photo in a process record. Keep it.
How Do You Run a Gate Freeze Study?
You run a gate freeze study by increasing hold time in steps and weighing the parts until the weight stops rising. At that point, the gate has frozen and extra hold time no longer adds material.
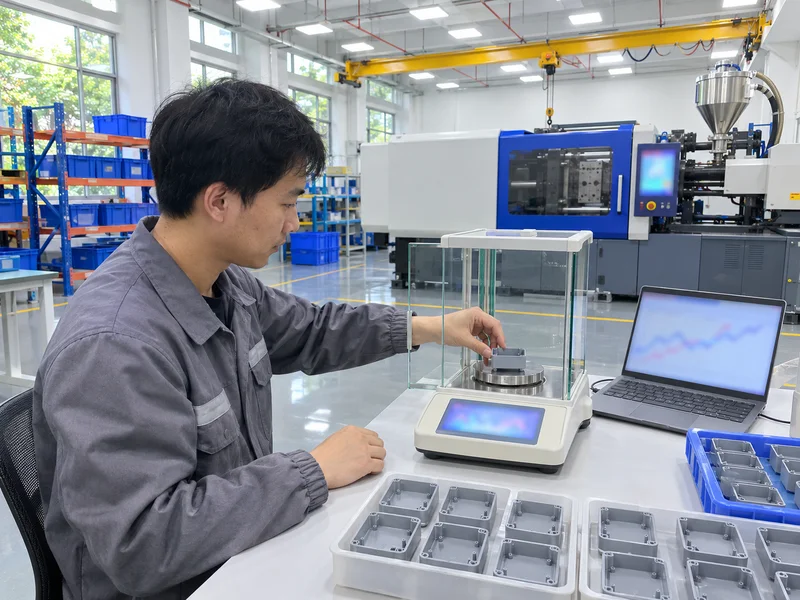
Typical procedure:
- Set pack pressure to a stable value.
- Start with a short hold time, for example 1 second.
- Increase in steps of about 0.5–1 second.
- Weigh parts from each step, ideally several per step.
- Plot weight vs hold time and find the plateau.
- Set the hold time slightly beyond the plateau.
For example, if part weight stops rising at 6 seconds, a hold of about 7 seconds gives margin. Shorter hold risks sink and dimensional variation, while longer hold wastes cycle time. Our guide to estimating molding cycle time shows where hold fits in the cycle.
Key Takeaway: Hold time is a measured value. Set it from the weight curve, not from habit.
How Does Back Pressure Affect Melt Quality?
Back pressure affects melt quality by controlling how much the screw resists moving back during recovery. Moderate back pressure mixes the melt and removes air; too much overheats it.
Practical settings:
- Low back pressure for heat-sensitive resins such as PVC or some flame-retardant grades
- Moderate back pressure for color mixing and consistent melt density
- Screw recovery should finish before the mold opens, so it does not extend the cycle
- Consistency: recovery time that varies shot to shot shows a material or heater issue
For example, streaks in a colored part can come from too little back pressure. Raising it slightly often fixes the mixing. However, glass-filled resins can suffer fiber breakage at high back pressure.
Key Takeaway: Use the lowest back pressure that gives uniform color and stable recovery time.
How Is Decoupled Molding Documented and Approved?
Decoupled molding is documented with the study results and a setup sheet, so the process can be repeated on any approved machine.
A complete record includes:
- Fill-only short shot and switchover position
- Viscosity or fill speed study, if required
- Pressure drop study, showing fill is not pressure-limited
- Gate freeze curve and chosen hold time
- Cushion, recovery time and cycle time
- Process window, with limits for key settings
Process studies like these are run during mold trials when the project requires them. Our quality control and inspection process can include trial reports with the process record, and a control plan can link each setting to a check.
Key Takeaway: Ask for the process record with the mold trial report. Settings without studies are hard to defend.
FAQ
- Q: What is decoupled molding?
- It is a method that controls fill by speed, switches by screw position and controls pack and hold by pressure.
- Q: Where should V/P switchover happen?
- Typically when the part is about 95–98% full, set by screw position and checked with fill-only shots.
- Q: How is hold time determined?
- By a gate freeze study: increase hold time until part weight stops rising, then add a small margin.
- Q: What is cushion in injection molding?
- The material left in front of the screw at the end of hold. It should be consistent and never zero.
- Q: How do you estimate clamping force?
- Multiply the projected area of parts and runners by a resin- and wall-dependent factor, typically about 0.3–0.8 t/cm².
Conclusion
Decoupled molding makes a process stable by giving fill, pack and hold their own controls and proving each with a study. Check press compatibility, size clamp and shot correctly, set switchover by position and hold time by gate freeze. To review the process for your part and mold, send your 3D model and 2D drawing to our engineers.