
Insert Molding Process: Insert Prep, Movement and Testing
The insert molding process places a pre-made component, usually a metal insert such as a threaded bushing, pin, terminal, shaft or stamped contact, into the mold and molds plastic around it in one cycle. The result is a single part that combines metal strength or conductivity with plastic shape and insulation. Insert molding replaces post-molding assembly steps such as heat-set inserts or press fits, and it often gives stronger, more consistent joints.
The most common insert molding problems happen during the cycle: inserts move, plastic flashes onto threads, inserts are dirty or cold, or the plastic cracks around them. For example, a brass threaded insert that shifts 0.2 mm under injection pressure can leave a thin wall on one side and fail a pull-out test. In this guide, we explain the insert molding process: steps, insert design and preparation, holding and measuring insert movement, thread protection, pull-out and torque testing, and quality control. For design rules, see our insert molding design guidelines.
The insert molding process loads metal or other inserts into the mold (by hand or robot), closes the mold, injects plastic around the inserts and ejects one finished part. Success depends on insert design (knurls, grooves, undercuts for retention), insert preparation (cleaning, preheating to reduce stress and improve bonding), secure location in the mold (pins, magnets, pockets, vacuum), shut-offs that seal threads and contacts, and validation through pull-out and torque testing, insert position measurement and cross-sectioning.
In short: design the insert for retention, prepare it clean and warm, hold it firmly, protect its functional surfaces and test the joint.
Key points:
- Location: inserts must not move during injection.
- Preparation: clean, dry and often preheated inserts.
- Validation: pull-out, torque and position checks.
What Is the Insert Molding Process?
The insert molding process is injection molding with a pre-placed component inside the cavity.
Typical steps:
- Prepare inserts: clean, inspect and preheat if needed.
- Load inserts into the mold by hand or robot.
- Close the mold and confirm insert presence.
- Inject plastic around the inserts.
- Cool and eject the finished part.
- Inspect insert position and plastic quality.
For example, a connector housing may be molded around eight stamped terminals in one shot. Our metal insert molding service covers such parts. For the difference from overmolding, see insert molding vs overmolding.
Key Takeaway: Insert molding turns assembly into a molding step, so molding quality now includes the insert.
How Should Metal Inserts Be Prepared for Insert Molding?
Metal inserts should be prepared so that they are clean, consistent and at the right temperature when loaded.
Preparation steps:
- Cleaning: remove oil, coolant and chips from machining or stamping.
- Inspection: check dimensions, burrs and plating.
- Preheating: warm inserts to reduce thermal stress and improve plastic contact.
- Handling: gloves or tools to avoid contamination.
- Storage: dry, covered and labeled by lot.
For example, cold brass inserts in a glass-filled PA66 part can cause cracks around the insert as the plastic shrinks onto cold metal. Preheating the inserts reduces this risk. Our guide to glass filled nylon explains shrinkage stress.
Key Takeaway: Oily or cold inserts are a leading cause of weak bonds and cracks.
How Do You Measure and Prevent Insert Movement During the Insert Molding Process?
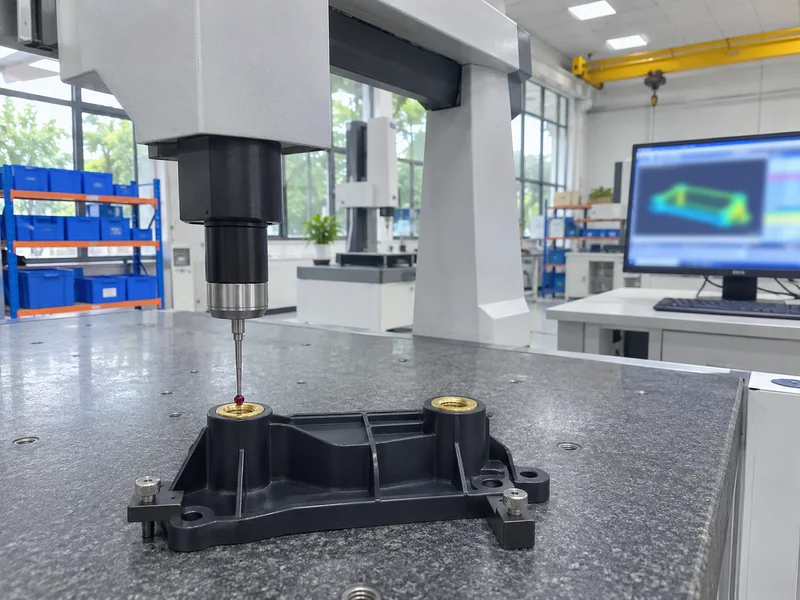
You measure and prevent insert movement during the insert molding process by holding inserts firmly and checking their position on molded parts.
Holding methods:
- Locating pins through insert holes
- Pockets that fit the insert outline
- Magnets for steel inserts
- Vacuum for flat inserts
- Spring-loaded or clamping features in the tool
- Gate location that pushes the insert against its support
Measuring methods:
- CMM or optical measurement of insert position
- X-ray or CT for hidden inserts
- Cross-sectioning of sample parts
- Wall thickness checks around inserts
For example, measuring insert position on parts from each cavity at trial shows whether flow pressure shifts them. Our guide to CMM measurement explains positional checks.
Key Takeaway: Measure insert position at trial, not only plastic dimensions.
How Do You Protect Threads and Contacts in Insert Molding?
You protect threads and contacts in insert molding with tight shut-offs and features that keep plastic out of functional areas.
Protection methods:
- Shut-off pins that seal threaded bores
- Insert designs with sealing shoulders or collars
- Blind inserts closed at one end
- Tight insert tolerances at sealing faces
- Flash checks on threads after molding
For example, a through-threaded insert needs a core pin on both sides to keep plastic out of the threads. A blind insert with a closed end is simpler. Our guide to threaded holes explains thread callouts.
Key Takeaway: Design the insert to seal against the tool. Plastic in threads is a common reject.
How Is Insert Molding Pull-Out and Torque Testing Done?
Insert molding pull-out and torque testing measures how well the plastic holds the insert.
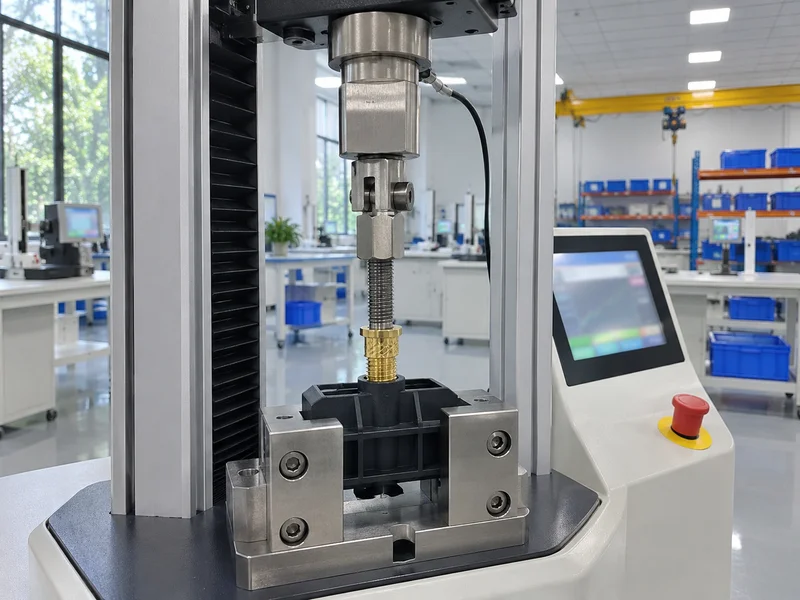
Tests:
- Pull-out test: axial force to pull the insert out
- Torque-out test: torque to turn the insert in the plastic
- Push-out test: for pins and shafts
- Thermal cycling before testing, when required
For example, a threaded insert may need a minimum torque-out of 2 N·m and pull-out of 500 N. Testing samples from each cavity confirms consistency. Test methods for fasteners in plastics are often based on standards from ASTM International.
Key Takeaway: Define pull-out and torque values on the drawing and test each cavity.
How Should Inserts Be Designed for Retention?
Inserts should be designed with features that lock them in the plastic against pull and torque.
Design features:
- Knurls (diamond or straight) for torque resistance
- Grooves and undercuts for pull-out resistance
- Flats or hex shapes for torque
- Smooth edges to avoid stress concentration
- Adequate plastic wall around the insert
For example, a knurled brass insert with a center groove resists both torque and pull-out. Our CNC turning service machines custom inserts to drawing.
Key Takeaway: Combine knurls and grooves for full retention.
How Is Quality Controlled in the Insert Molding Process?
Quality in the insert molding process is controlled by checking inserts before molding and parts after molding.
Controls:
- Incoming insert inspection
- Insert presence sensors in the tool
- Robot or fixture checks for correct loading
- Insert position measurement at defined frequency
- Pull-out and torque tests by lot
- Traceability of insert lots
For example, a missing-insert sensor stops the press before a part without a terminal is molded. Our quality control and inspection process records such checks.
Key Takeaway: Use insert presence detection on every insert molding tool.
FAQ
- Q: What is the insert molding process?
- Placing a pre-made insert into the mold and molding plastic around it in one cycle.
- Q: Why are inserts preheated?
- To reduce thermal stress, improve plastic contact and lower the risk of cracking.
- Q: How do you stop inserts moving during molding?
- Use locating pins, pockets, magnets or vacuum, and place the gate to push inserts against supports.
- Q: How is insert retention tested?
- With pull-out, torque-out or push-out tests on molded samples.
- Q: How do you keep plastic out of insert threads?
- Use shut-off pins, sealing shoulders or blind inserts.
Conclusion
The insert molding process works when inserts are designed for retention, prepared clean and warm, held firmly and protected at functional surfaces, and when joints are tested. Measure insert position at trial. To review an insert-molded part, send your 3D model and 2D drawing to our engineers.