
Injection Molding Wall Thickness Guidelines by Material
Injection molding wall thickness is the single most important design parameter for a molded plastic part. It decides how well the part fills, how long it takes to cool, how much it shrinks and warps, whether sink marks appear and how strong and stiff it is. Small and medium housings, covers, brackets and connectors all start with a wall thickness decision.
Most molding defects can be traced back to walls that are too thick, too thin or uneven. For example, a 4 mm boss on a 2 mm housing wall almost guarantees a sink mark on the cosmetic side, while coring it out to 2 mm removes the sink and shortens the cycle. In this guide, we explain injection molding wall thickness: recommended values by material, why uniform walls matter, transitions, ribs and bosses, thin-wall considerations, effects on cost and how to check walls during design. For general rules, see our guide to basics of injection molding design.
Injection molding wall thickness is typically about 1–3 mm for most small and medium parts, with recommended ranges depending on resin (for example ABS 1.1–3.5 mm, PC 1–4 mm, PP 0.8–3.8 mm, PA 0.8–3 mm, POM 0.8–3 mm). Walls should be as uniform as possible; where thickness changes, use gradual transitions of about 3:1 taper. Ribs are usually 50–60% of the wall, bosses are cored out, and corners use radii. Thicker walls increase cooling time, sink and voids; walls that are too thin cause short shots and high pressure. Check walls with thickness analysis and mold flow before release.
In short: keep walls thin, uniform and within the resin’s range, and use ribs instead of thickness for stiffness.
Key points:
- Typical range: about 1–3 mm.
- Uniformity: reduces sink, warpage and stress.
- Stiffness: ribs, not thick walls.
Why Does Injection Molding Wall Thickness Matter?
Injection molding wall thickness matters because it controls filling, cooling and shrinkage.
Effects:
- Cooling time: grows roughly with the square of thickness
- Shrinkage: thicker sections shrink more
- Sink marks and voids: appear in thick areas
- Warpage: from uneven thickness
- Filling: thin walls need higher pressure
- Cost: thick walls use more resin and cycle time
For example, doubling a wall from 2 mm to 4 mm can roughly quadruple cooling time. Our guide to injection mold cooling time calculation formula explains the relationship.
Key Takeaway: Above all, wall thickness drives both quality and cycle time.
What Wall Thickness Is Recommended for Each Material?
Recommended wall thickness depends on the resin’s flow and shrinkage.
| Material (typical) | Recommended range |
|---|---|
| ABS | about 1.1–3.5 mm |
| PC | about 1.0–4.0 mm |
| PC/ABS | about 1.0–3.5 mm |
| PP | about 0.8–3.8 mm |
| PA (nylon) | about 0.8–3.0 mm |
| POM | about 0.8–3.0 mm |
| PBT | about 0.8–3.0 mm |
| LCP | about 0.2–3.0 mm |
For example, LCP can fill very thin connector walls that ABS could not. Values vary with part size and flow length; resin suppliers publish specific guidance. Our injection molding material selection guide compares materials. Test methods for plastic properties such as mold shrinkage are standardized by ISO.
Key Takeaway: In other words, start within the resin’s range, then adjust for flow length.
Why Should Injection Molding Wall Thickness Be Uniform?
Wall thickness should be uniform because uneven walls cool and shrink unevenly.
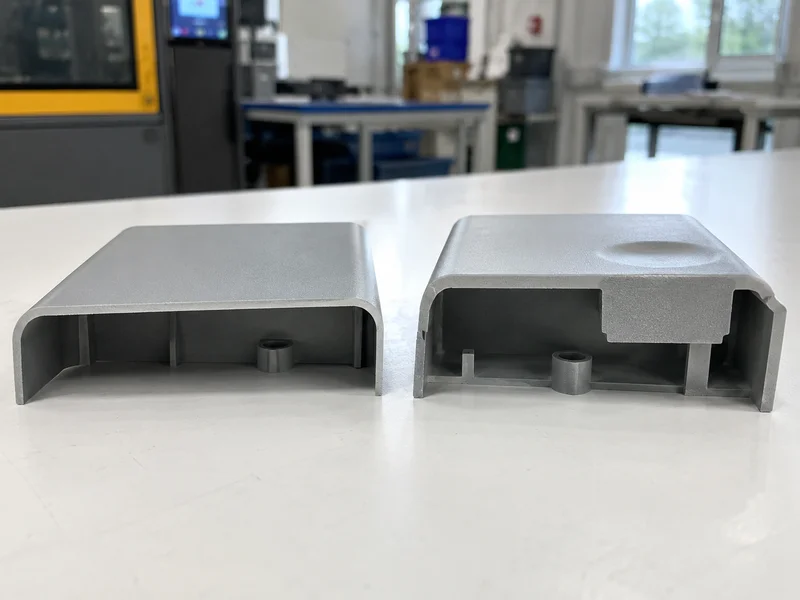
Problems from non-uniform walls:
- Sink marks over thick areas
- Warpage from differential shrinkage
- Voids inside thick sections
- Flow hesitation at thin areas
- Residual stress at transitions
For example, a cover with a thick edge and thin center may bow after molding. Making the edge the same thickness as the center reduces warpage. Our guide to warpage plastic parts explains differential shrinkage.
Key Takeaway: For this reason, aim for one nominal wall throughout the part.
How Should Wall Thickness Transitions Be Designed?
Wall thickness transitions should be gradual where thickness must change.
Guidelines:
- Taper transitions over a length about three times the thickness change
- Avoid steps in cosmetic areas
- Gate into thicker sections so they pack before thin areas freeze
- Radii at internal and external corners
For example, changing from 3 mm to 2 mm over a 3 mm long taper reduces stress and flow marks. Our guide to flow marks in injection molding explains hesitation at transitions.
Key Takeaway: Overall, never jump wall thickness abruptly.
How Do Ribs and Bosses Relate to Wall Thickness?
Ribs and bosses should be sized relative to the nominal wall to avoid sink and voids.
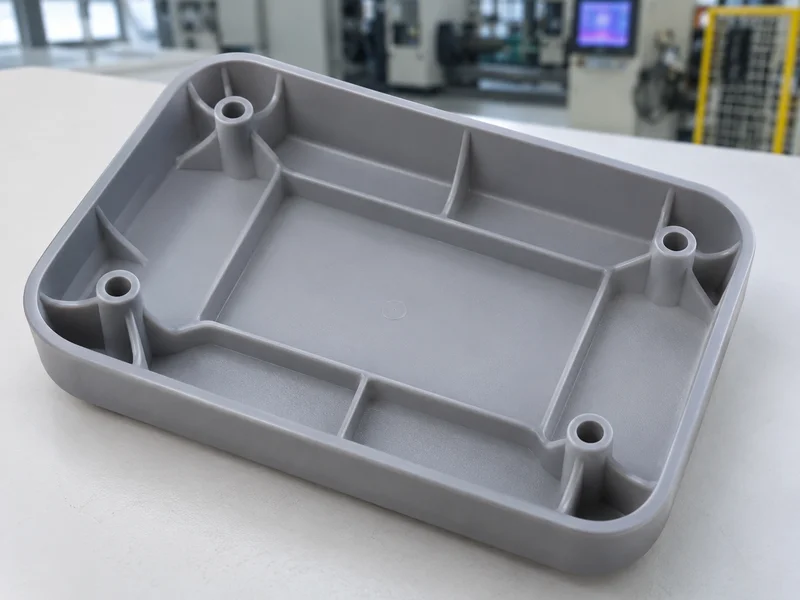
Rib guidance:
- Rib thickness: about 50–60% of the wall
- Rib height: up to about 3× the wall
- Draft: about 0.5–1° per side
- Root radius: about 0.25–0.5× the wall
Boss guidance:
- Core out bosses to keep wall thickness
- Connect to walls with ribs or gussets
- Avoid isolated thick masses
For example, a 2 mm wall uses ribs about 1–1.2 mm thick. Our guide to the screw boss explains boss design.
Key Takeaway: Equally, use ribs for stiffness instead of thickening walls.
What About Thin-Wall Injection Molding?
Thin-wall injection molding uses walls below about 1 mm for small parts, with special demands.
Considerations:
- High injection speed and pressure
- Short flow lengths or more gates
- Easy-flow resins
- Robust, well-vented molds
- Hot runners to shorten flow paths
For example, a 0.6 mm wall connector housing in LCP needs fast injection and good venting. Our guide to thin wall injection molding explains these demands.
Key Takeaway: As a rule, thin walls shift difficulty from the part design to the mold and process.
How Is Injection Molding Wall Thickness Checked During Design?
Wall thickness should be checked during design with analysis tools and review.
Checks:
- CAD thickness analysis to find thick spots
- Mold flow analysis for filling, packing and warpage
- DFM review with the toolmaker
- Sample measurements of critical walls after trials
For example, a thickness map may reveal a 5 mm mass behind a boss that the designer missed. Our engineering and DFM review and mold flow analysis help catch such areas.
Key Takeaway: Finally, run a thickness check before the mold design starts.
FAQ
- Q: What is a good wall thickness for injection molding?
- Typically about 1–3 mm, depending on resin and part size.
- Q: Why should walls be uniform?
- Uneven walls cause sink, warpage, voids and stress.
- Q: How thick should ribs be?
- About 50–60% of the nominal wall.
- Q: What happens if walls are too thick?
- Longer cycles, sink marks, voids and higher cost.
- Q: What happens if walls are too thin?
- Short shots, high pressure and possible weak areas.
Conclusion
Injection molding wall thickness controls filling, cooling, shrinkage and cost. Keep walls thin, uniform and within the resin’s range, use gradual transitions and ribs, and check thickness before tooling. To review your design, send your 3D model and 2D drawing to our engineers.