
Pad Printing on Plastics: Inks, Design and Testing
Pad printing is an indirect offset printing process that transfers ink from an etched plate to a part through a soft silicone pad. Because the pad deforms around shapes, pad printing can put logos, scales and text on curved, recessed and textured surfaces. Typical parts are buttons, knobs, caps and appliance panels, where screen printing or labels do not fit.
The process is simple, but adhesion depends on the plastic. For example, a logo on an ABS housing usually bonds well with a standard solvent ink. However, the same logo on a polypropylene cap may rub off unless the surface is flame or plasma treated first. In this guide, we explain how pad printing works, which plastics and inks suit it, how it compares with screen printing and laser marking, design rules, quality tests and how to specify it. For marking alternatives, see our guide to laser marking plastic.
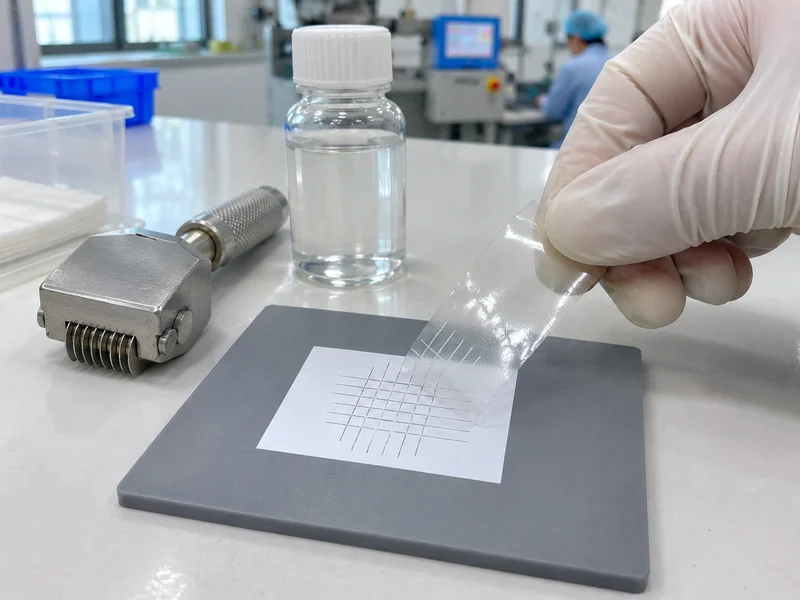
Pad printing uses an etched steel or photopolymer plate (cliché), an ink cup or open inkwell, and a silicone pad. The pad picks up ink from the etched image and presses it onto the part. Ink layers are thin, about 3–10 µm, and fine lines down to roughly 0.1 mm are possible. Multi-color prints use several stations or a shuttle. Polypropylene and polyethylene have low surface energy and normally need flame, corona or plasma treatment, or special inks, for good adhesion. Adhesion is commonly checked with a cross-hatch tape test such as ASTM D3359.
In short: pad printing suits small, curved or recessed graphics on molded parts, provided ink and surface treatment match the plastic.
Key points:
- Surfaces: curved, recessed, textured.
- Ink film: about 3–10 µm.
- Low-energy plastics: need treatment.
How Does Pad Printing Work?
The process works in a repeating cycle of filling, picking up and transferring ink.
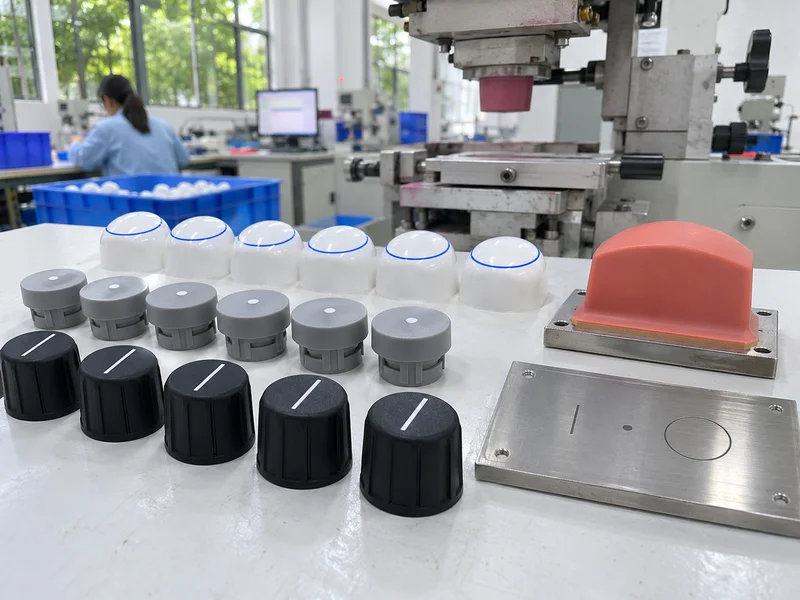
- Fill: the ink cup moves over the plate and fills the etched image
- Doctor: the cup edge wipes excess ink off the plate surface
- Pick up: the silicone pad presses on the plate and lifts the ink
- Transfer: the pad presses onto the part and releases the ink
- Dry or cure: air drying, heat or UV, depending on the ink
For example, a two-color logo on a remote control button is printed with two plates and two pads, with the part held in a nest that keeps registration between colors. Our guide to plastic housing design shows typical printed parts.
Key Takeaway: Above all, the pad, plate and fixture together decide print quality.
Which Plastics and Inks Work Best?
The plastics that print best have medium to high surface energy.
| Plastic | Printability | Typical approach |
|---|---|---|
| ABS, PC, PC/ABS | Good | Solvent or two-component ink |
| PMMA, PS | Good | Solvent ink, watch for stress cracking |
| PA (nylon) | Fair to good | Two-component ink, dry parts |
| POM | Difficult | Special ink or pretreatment |
| PP, PE | Difficult | Flame, corona or plasma treatment |
| TPE, TPU | Fair | Flexible inks |
For example, a PP closure is often flame treated to raise surface energy above about 38 mN/m before printing. Two-component inks with hardener improve chemical and abrasion resistance. Our guide to caps and closures covers PP parts that are often printed.
Key Takeaway: In other words, choose the ink with the resin, not after molding.
How Does Pad Printing Compare With Other Methods?
It compares with screen printing, laser marking and in-mold labels by shape, durability and cost.
| Method | Best for | Limits |
|---|---|---|
| Pad printing | Small, curved or recessed graphics | Thin ink, small image area |
| Screen printing | Flat or cylindrical, large, opaque areas | Needs flat or round surfaces |
| Laser marking | Permanent marks, serials, no ink | Limited colors, needs laser-sensitive grade |
| In-mold labeling | Full-surface graphics | Tooling and film cost |
| Hot stamping | Metallic foils | Flat or simple surfaces |
For example, a curved knob with a white pointer line suits pad printing, while a flat front panel with large text may be cheaper to screen print. Our guides to in-mold labeling and injection molding surface finishes cover other options.
Key Takeaway: For this reason, compare methods by surface shape first, then by volume and durability.
How Should Parts Be Designed for Printing?
Parts should be designed for printing with a stable print area and good access for the pad.
- Print area: smooth or lightly textured, away from sharp edges
- Curvature: gentle curves print well; deep steps distort images
- Recesses: shallow recesses are fine; keep walls sloped
- Gates and weld lines: keep them out of the print area
- Fixturing: add flats or features so parts sit in a nest
- Mold release: avoid silicone sprays that block adhesion
For example, moving a gate from the top face of a button to its side keeps the print area clean and level. Our guide to fixing weld lines explains how to move them.
Key Takeaway: Overall, decide the print area during mold design, not after T1 samples.
How Is Pad Printing Quality Tested?
Print quality is tested for adhesion, durability, color and position.
| Test | Purpose |
|---|---|
| Cross-hatch tape test | Adhesion of the ink film |
| Rub test (eraser, cloth, alcohol) | Abrasion and chemical resistance |
| Color check | Match to Pantone or approved sample |
| Position and registration | Location tolerance and color alignment |
| Visual | Smears, voids, ghosting and pinholes |
For example, a button print may need to survive a set number of rubs with an eraser or alcohol cloth without losing legibility. Adhesion methods are defined by ASTM. Our guide to AQL sampling explains how batches are checked.
Key Takeaway: Equally, agree test methods and limits before mass production starts.
What Are the Process Limits?
The limits of the process come from the thin ink film and small pad.
- Image size: usually small areas, often under about 100 mm
- Opacity: light colors on dark parts may need two passes
- Durability: thin ink wears faster than laser marks or IML
- Low-energy plastics: need treatment or special inks
- Cost: each color adds a station and a step
For example, a white logo on black PC may be printed twice to look solid, which adds cycle time and cost per part. Our guide to masterbatch explains how base color affects decoration.
Key Takeaway: As a rule, use laser marking or IML where graphics must last the product’s life under heavy wear.
How Should Pad Printing Be Specified?
The print should be specified with artwork, color, position, ink and tests.
- Artwork: vector file with sizes
- Color: Pantone or approved color sample
- Position: location and tolerance on the drawing
- Ink type: solvent, two-component or UV
- Pretreatment: flame, corona or plasma for PP and PE
- Tests: adhesion, rub and chemical tests with limits
For example, “Logo white Pantone 11-0601, position ±0.2 mm, two-component ink, cross-hatch 4B min, 50 alcohol rubs” gives a clear basis. We do not run pad printing in-house: printing lines have their own environmental requirements, so the printing is done by specialized partner factories while we coordinate molding, printing and inspection as one project. Our plastic injection molding page explains how projects are set up.
Key Takeaway: Finally, put the decoration requirements on the drawing so every supplier quotes the same thing.
FAQ
- Q: What is pad printing?
- An offset process that transfers ink from an etched plate to a part with a silicone pad.
- Q: Can pad printing print on curved surfaces?
- Yes, the soft pad conforms to curves and recesses.
- Q: Can you pad print on polypropylene?
- Yes, usually after flame, corona or plasma treatment.
- Q: How durable is pad printing?
- Good with the right ink, but thinner than other marking methods.
- Q: Is pad printing better than screen printing?
- For small curved parts yes; for large flat areas, screen printing is often better.
Conclusion
Pad printing is a flexible way to put fine graphics on small or curved molded parts, as long as ink, surface treatment and print area are planned with the part. Specify artwork, color and tests clearly. To review a molded part with printed graphics, send your 3D model and 2D drawing to our engineers.